Saturday 28 January 2012

Modifying my Curling Iron

I recently saw a tutorial on how to turn you curling iron into a curling wand (here), and had to try it!

The difference between the two is simple: one has a clamp, and the other one doesn't. I know a lot of people prefer wands, and I've somehow ended up owning two curling irons, so I decided to give it a go! 
Note: If you keep the parts you take off, it's easy to put back together again if you change your mind.

The Process


So obviously you start off with your iron, and the first thing you do it pull off the metal stand, like below:


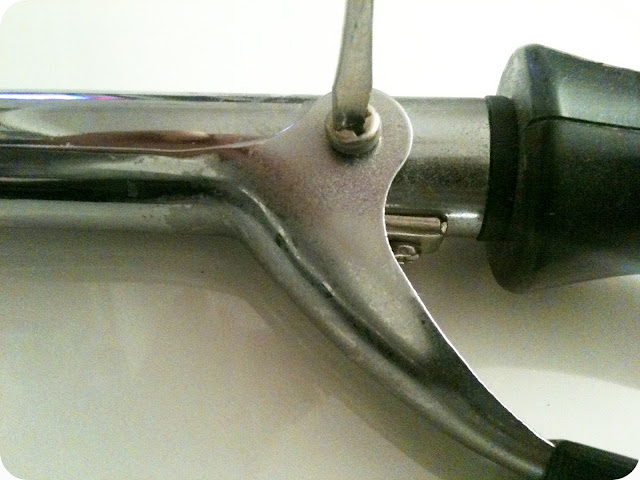
Next you want to remove the screws either side of the clamp (lets ignore the fact that I'm clearly using the wrong kind of screwdriver in the photo below!)


Once the clamp has been removed, you'll be left with the spring:


The last step is to unscrew and remove this spring.
(This screw was quite small, luckily I'd won a pack of mini screwdrivers in a cracker at Christmas! Haha)


And that is basically it! All you need to do is keep the parts in a safe place in case you change your mind.
(and in my case give it a good clean, as mine was quite heavily covered in hairspray :/)


The Final Result

Now you're left with a lovely 'new' curling wand!

I can see this saving me a lot of time creating curls, as I don't have to faff around with the clamp, or risk getting it tangled in my hair (-yes I am that hopeless).
Can't wait to try these out!

I hope you liked this tutorial and found it useful. 
I'd love to know your favourite curling tool/techique?


SHARE:

Wednesday 25 January 2012

Zumba Review and Progress

You may have seen from my Christmas post that I received the Zumba DVD set from my sister. I've been using it all of this month in an effort to stick to my new years resolution, and I thought I'd let you know my thoughts on it so far.


What You Get:

Altogether you get 4 DVDs:
-Basic & 20-minute Express 
-Cardio
-Sculpt & Tone
-Live & Flat Abs
You don't get the bracelet unfortunately, I bought this off eBay

And with the DVDs you get 2 toning sticks, and a guide. The guide is really useful as contains meal plan templates, and 3 different workout plans for you to choose from (depending on what you would like to get out of the work-outs).

The Programme:

The first one is one everyone should to - the beginner workout.
This is a 7 day programme which first gets you to learn the basic Zumba moves, and on the last 2 days you do the '20 minute express workout.' I honestly thought I wouldn't get much of a workout with this beginners programme, but I even found learning the dance moves quite hard going! There were a couple of moves I thought were impossible (the 'sabor step' being one of them! clip here), so I'm glad they got you to do that programme for 3 days in total as now I actually know how to do them! Most of them I picked up quite quickly though.

Next you choose a 10-day programme:
I don't want to lose weight, I only wish to majorly tone up, so I chose their 'Sculpt and Tone workout.'
It consists of mixing and matching the three DVDs below, and using the toning sticks for the workouts in the 'Sculpt & Tone' DVD.


I'm currently on day 5 of this workout and I'm really enjoying it. It's basically 3 days of workouts (they tell you which) then a day off to relax. Then another 3 days working out, etc. 

Results so Far:

I have actually noticed a few differences:

Mobility: You may have seen me mention that I was recently diagnosed with Degenerative Disc Disorder, and I do struggle to walk far sometimes as I get a lot of pain in my lower back and down my right leg. 
Because Zumba gets you to move your hips a lot, you are toning your lower back and building up strength. I did struggle to fully do some of the Zumba moves at the beginning, but now not only can I do them all properly now, but the other day I took my dog for a walk, and not only did I walk the whole way without any pain, but I was actually running about and playing with her which for me is huge!

Toning: I haven't visibly noticed any change in muscle tone, BUT I have definitely felt it. I'm quite a petite person, but I had next to no muscle and practically all of me (especially my bum and upper legs) were very, for lack of a better word, squishy. If I tried to tense my 'muscles' nothing would happen. 
-Now there is definite muscle there, and when I tense something actually happens! 

Verdict

So far I am very impressed with this workout, and considering that in total I've technically only done 9 days of Zumba workouts, these are huge changes. I'm so happy my sister got me this!

Price: You can buy it off the official website (here) for £49.98 (it's the one at the bottom), and you get a 30 day money back guarantee.
Alternatively (I think this is what my sister did) you can buy it on amazon (here), and currently you can buy it there for £29.99. Personally I would have happily paid the full amount for it - but who doesn't love a bargain?

The other programme they offer in this set is a Cardio workout. I haven't tried this one yet, but I will be doing this one once I've finished my current programme. Then I'll see which one I prefer, and carry on with that one.

If you made it all the way to the end of this post: Well done! This one was very wordy, but I wanted to review it all properly. The next one wont be so long!

I hope you found this helpful if you were thinking of trying out these DVDs - or even Zumba in general. 


SHARE:

Tuesday 24 January 2012

DIY Cleanser for Sensitive Skin

Difficulty Rating:
Recently my skin has become very sensitive, and reacts to certain products. So I decided to try using natural products as an alternative, as my skin is less likely to react to it (and if it does, I know to just avoid that one product).

One thing thats recommended for sensitive skin, that can also be found in products by Lush and Aveeno etc, is Oats. You can pick up a bag of oats very cheaply from the supermarket, and it lasts absolutely ages!
So you're saving money, and at the same time saving your skin from chemicals.
(-Though obviously if you are intolerant to eating oats, I'd steer clear of using this on your skin too!)

There are all sorts of ways you can use oats in your skincare regime, but this is the quick and simple way I use it in mine:

The Process

Firstly, I store my oats in this cute biscuit jar by my barthroom sink. I can't find the lid to it though - hence the tin foil! (I'd recommend keeping it covered so it stays fresh, and doesn't get damp from steam).

All you do is pick up a handfull of the oats, and then loosely clench your hand into a fist.


Whilst in a fist, you want to hold your hand under warm water. The idea is to get enough water through your fingers to create a paste with the oats.


You can see below the water becomes milky from the oats - you want to try not to let this drain away as this is good for your skin too.
-If you do accidentally let it drain away, it's not the end of the world!


Below is what the paste should look like:


Then you want to massage it onto damp skin. 
I mostly use this on my face, but you can even use this on your body when you take a shower if you wanted to.


Once you're done, you just rinse it off in warm water, or with a wash cloth (whichever you prefer), and then carry on with the rest of your regime.


Its really quick and easy, and oats make a great gentle exfoliator.

You can feel straight away how it moisturises the skin, and makes it lovely and soft.

As well as sensitive skin, oats are also recommended for the treatment of dry/eczema skin, and offer great relief to many sufferers. I've recently found I have it on my legs, and most products I've tried cause me no end of grief. Using oats in this way on my legs defintely helps to calm my skin down.

Alternative Uses

In The Bath: You can also put handfulls of oats in an old (clean!) pair of tights, and hang it around the tap when you run a bath and it will make the bath all milky. Or even just put the tights in the bath, and you can even use the oat-filled tights as an exfoliator too. - Either way you'll end up with beautifully soft skin!

DIY Oat Cleansing Milk & Oat Moisturising Cream: Do check out this great post by Voe on her blog here, where she shows you how to make these two products for beautifully soft and soothed skin.

More Recipes: You can also find more great DIY recipes using oats just through searching google/youtube.

I hope you found this post helpful.
I'd love to hear if you have any alternative DIY recipes for oats, or any other DIY recommendations for dry/sensitive skin!


SHARE:

Saturday 21 January 2012

False Lashes Review

My lashes are quite long, but dead straight and next to impossible to curl, and as a result it can look like I have no lashes!
I had found a mascara that actually gave them a curl (see post here), but I haven't been able to find it in the shops for a few months now, so I think its been discontinued :(

So I've been looking into false eyelashes as a substitute for my stubborn lashes.
The one trouble I have with most lashes is, because my eyes are quite small compared to most peoples, I struggle to find ones that look right (and that's even after I've trimmed them down to fit).

On eBay I came across this pack of 10 natural lashes for £2 from a UK seller, and thought they were an absolute bargain. And if they didn't look right I wouldn't have lost much!

The Lashes

From first impressions these lashes look like they're quite good qualitly. They don't look too daunting either. Usually I would immediately assume the thicker the lashes, the better they would look on. But I'm starting to learn thats not always the case, hence my trying these 'natural' look lashes.


I really like how natural these look, and they don't look ridiculous on my tiny eyes! The main problem I have with lashes that are thicker than these is that their heaviness tends to be made to suit 'normal' sized eyes better, so once trimmed down they can end up looking a bit peculiar on me. I should have looked into getting the natural ones sooner!

I've learnt with false lashes its mostly trial and error until you find the right ones for you, as no ones eyes are the exact size/shape. But these I love, and will definitely repurchase! I know I'll get a lot of use out of these lashes because they're so natural I can wear them during the day without worrying about them looking fake. 

Strangely the seller I bought them from don't seem to be selling false lashes any more, but you can buy the same ones for 99p from a seller in Hong Kong (here), and they offer a lot more choice of lashes (these are number 108). 


Eye Products Used:

Brows: HD Palette 'Foxy'
Eyeshadows: MAC 'Vanilla' and 'Cocomotion' pigments, and MAC eyeshadow 'Satin Taupe'
Eyeliner: Rimmel Exaggerate '100% Black' & Gosh eyeliner pencil 'black'
Mascara: Rimmel 3 looks mascara 'Black'

What are your thought on these lashes? I'd love to hear any recommendations.

SHARE:

Friday 20 January 2012

Lumiere Cosmetics Review & FOTD

Just before the new year, I was sent a few products to test out and review by Lumiere Cosmetics
Altogether I received 7 sample sized jars of their products: 3 eye pigments, 2 blush's, and 2 foundations so I could choose which shade matched me best. 

I'll start by reviewing the products and giving my overall verdict, and at the end you'll find my FOTD where I've used most of the products in this post.

So without further adieu, here are my thoughts on the products I was sent:

Foundation

The foundation that matched best was the shade 'Light Medium Warm'.

This is quite a nice mineral foundation. It doesn't fully cover any redness or imperfections on the skin, but then it doesn't claim to, so you will need to use a separate concealer with this (they do sell some on their site, but I haven't tried them so can't tell you what they're like). 

Price: Full sized (12g) these cost $18 (approx £12). This is a lot cheaper than my usual Bella Pierre foundation (£35), and you get a lot more foundation compared with Bella Pierre's 9g. But I do prefer the finish of Bella Pierre's foundation, and I love the coverage it gives.
Blush

I love the pigmentation of these blushes. It's actually really difficult for me to select a favourite out of the two. The Neutral Pink is such a beautiful pink, and think out of the two it would be suitable for most people. Though the Sweet Cherub is a lovely rose gold, and I have yet to try blush's of this shade so I'm really happy I was sent this one!

Price: Full size (4g) these are worth $12 (approx £8), and these go a VERY long way, so these are definitely good value for money!
Eye Pigment

As with the blush's, these Eye Pigments are really pigmented, and are very beautiful and unusual colours.

The most versatile of these three eye pigments (in my opinion) is the Ditto 02. Its such a lovely iridescent pink/purple. It makes a good highlighter or base colour. 
And with my love of purple, of course I love the Wicked eye pigment! This is a kind of grape/lavender colour, and I know I'd get a lot of wear out of this!

Hypnotic is such a difficult colour to describe! At first glance it looks like a metallic brown, yet when applied there are hints of a rich plum/purple colour. Whatever colour it is - I really like it. I think it's my favourite out of the three.

Price: Full sized (2g) these cost $8 (approx £5) I think these are also good value for money, and as with their other products, a little goes a long way so they would last a while! 

Verdict

I do think Lumiere sell very good quality products, and at great value for money. They offer international shipping starting from $6 (approx £4), and you can view and buy their products by clicking here.

I am absolutely in love with their blush's and eye pigments, and highly recommend them! I will definitely be purchasing from them again in the future. If you don't want to commit to full sized products, you can also purchase smaller jars, or even sample bags/jars. 

For me I'm torn between the Lumiere foundation: a great price for a lot more product; or my usual Bella Pierre foundation: more money for a lot less product, but great coverage and finish.  

You can judge for yourselves whether these products are you by seeing these products put to use:

FOTD

Face Products Used:

Foundation: Lumiere 'Light Medium Warm'*
Concealer: Collection 2000 (not pictured)
Pressed Powder: 17 'Nicely Natural'
Blush: Lumiere 'Neutral Pink'*
Highlight: Topshop 'Sunbeam'


Eye Products Used:

Eyebrows: HD Palette 'Foxy'
Eye Pigments: Lumiere 'Ditto 02' and 'Hypnotic'*
Eyeliner: Rimmel Exaggerate Liquid Liner 'Dark Brown'
Mascara: Estee Lauder Double Wear 
(*I'm really unimpressed with this mascara, as you can see from the photo's it doesn't hold the curl at all, and I didn't really like the way it dried on my lashes. Not a nice finish)


Lip Products Used:

Lip Balm: Lush's Ultrabalm (Majorly in love with this!)
Lipstick: Topshop Lipstick 'Enamoured'


SHARE:

Thursday 19 January 2012

Purple Passion NOTD


I usually wear quite muted colours or nudes on my nails, but I thought I'd change it up and go a bit brighter today!

I figured I'd try Estée Lauder's 'Pure Colour' nail polish in shade Purple Passion. This is the first time I've worn it, and it really is weird wearing a bright colour for once.
Personally though I wouldn't really call this purple. It's more of a hot pink/fuchsia. Nonetheless I still love it!

I can see myself wearing this a lot more during the spring and summer months, as I think it would look really nice with a tan. (Not that anything's wrong with the fake kind - I just keep forgetting to apply it!)


SHARE:

Wednesday 18 January 2012

London Haul pt.2

Continuing with part two of my London Haul (you can read part one here), these are a couple of things I picked up in Muji:

Muji Pill Box

I saw this in the Muji concession in Selfridges and thought it would be perfect for using as a lipstick palette, or to mix pount paints/lip tars in (lipstick is there so you can get an idea of its size). And it was only £1.25 from their travel section. Though the dividers are removeable, so not water-tight. If you were to use this to melt lipsticks into, you may want to permanently glue the dividers down first.

Muji Wide 2-Drawer Storage
Last but by no means lest, I finally got myself one of the Muji drawers! I have been lusting after one of these for a while now, but I don't live anywhere near a Muji store. I took advantage of being in central London for the day and picked this up in Selfridges.

Obviously the photo above is off the website (I forgot to take photos before I filled it), but below are photos of how I'm not using it from bottom to top:

Bottom Drawer

I filled the bottom drawer with all of my Barry M Dazzle dusts, a few benefit pigments and some miscellaneous ones. This is the heaviest drawer, so I'm keeping this at the bottom in case the weight is too much for it, at least the drawer will have the support of my desktop underneath!

This drawer is the result of far too many 3for2 offers on Barry M dusts in Superdrug. I haven't seen any of those offers for a while now, so for now it hasn't grown any further. But I'm sure that wont last for long..

Top Drawer

In the top draw I've put my MAC pigments, undepotted MAC eyeshadows, and any other eyeshadows/pigments that aren't in palettes.
As you can see this set of drawers is just for my eyeshadows, and its got a bit of room left in the top drawer in case my Dazzle Dust collection grows again!

On Top

On top of my drawers I've temporarily laid out a few of my blushes. 
I am definitely going to buy another one of these drawers next time I go to London, and it will be solely to store my blushes and bronzers. I don't want to pile them on top of each other as I want to be able to see everything I have at a glance.

What are your thought on the Muji drawers? I think I've already become addicted to them as I'm definitely eager to get more! -Which is a little worrying in regards to my bank balance...
SHARE:

London Haul pt.1

I was originally going to post this haul all at once, but it was a bit long so I'm now going to post about it in two parts. So here's part one of the haul:

Yesterday I had quite a stressful day in London yesterday - I went to 2 museums to research for my course, and both things I needed to see were either permanently gone, or temporarily closed. So I decided to do a bit of retail therapy to cheer myself up - and to make it feel like my trip wasn't a total waste!

I decided to go to Topshop in Oxford Street as I had gift cards to spend from Christmas, so of course I made a bee-line for the make up department.
I've never really used any of their make up before, but have always been curious to try them after seeing them on a few blogs.

Highlighter

As I only wear mineral foundation, powder not liquid, I've been on the lookout for a good powder highligher, and I really liked the colour and sheen of this one. Plus it's the size of a powder compact, so it will definately last a while. This highlighter cost £10, but I think I'm going to get a lot of use out of it so I guess it's worth it! 

Lipstick

This lipstick is in the shade Enamoured. I had a look at their normal bullet lipsticks, but I didn't really think any of the colours would suit me. Then I saw they had 2 more colours in their lipstick pencils. I chose enamoured as its a nice subtle everyday colour. I just wish they had a wider range of colours. But this looks like it will last a long time, so the price tag of £7 isn't too bad. 

Also, this is a weird thing to say, but the scent of this lipstick reminds me of playdough. Personally I like it as it reminds me of my childhood, but if you don't like that smell - you have been warned!

You can see it in use properly here.

Eyelash Curler

This I bought because my cheap Wilkinsons eyelash curler has turned against me and started ripping out my eyelashes! I really like the fullness of the rubber insert, which looks like it will last a long time. Plus it comes with a spare for when the other wares out. 

My only problem with this curler is I wish it opened up a little wider, but it's not a huge issue. At £5 I would definitely get this again. It's a shame they don't sell separate packs of the inserts separately as this is a good little curler. It seems a bit of a waste to have to buy a new one when all you need is a tiny insert!

Tape Measure Ring

Seeing as I study fashion design where I have to design and make a lot of stuff, this ring is probably a little too obvious and clichéd, but when I saw it I had to get it! I absolutely love it and probably wont be taking this off for a while!
In case you're wondering this ring cost £8.50.

Scissor Earrings

You can probably guess the V&A was one of the museums I went to. I didn't realise their permanent fashion exhibition was closed for refurbishment, so I decided to browse the gift shop to see if they sold any postcards/photos of the exhibition. Whilst I was there I came across these cute scissor earrings.

I love stud earrings for everyday wear, and as with the ring, I thought these were too good not to buy! And they were only £3.50 so I snapped them up straight away.

So that's part one! Part two will be posted after this, alternatively you can click here to read it.


SHARE:
@ Beauty Not Just Skin Deep.